Architecture: |
X32 / NX32 / NX32L |
Device support: |
MX2i pro, CX1 pro/flex/warp, SX1, MX2 turbo, NX-200, NX-400, NX-900, LX2 |
Firmware version: |
2.64 / 1.00.00 |
Nav. API level: |
2 |
This function will initialize a configurable button on the NMP.
It is not necessary to call this function as all the settings can be set with the functions for the individual properties, but this makes it possible to set all the visible properties at once. Using this function will avoid showing the user the intermediate states.
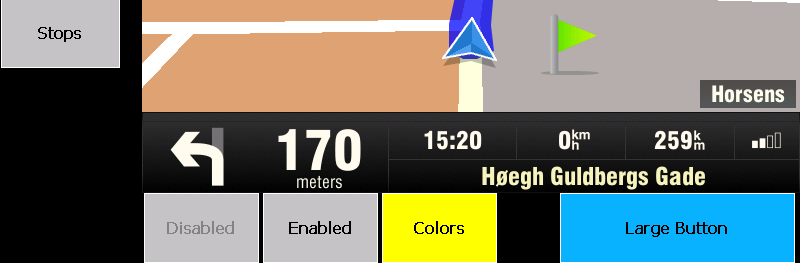
The following parameters was used to create the buttons on the following image.
ID |
text |
weight |
visible |
enabled |
color |
1 |
Disabled |
2 |
True |
False |
16#C0_C0_C0 |
2 |
Enabled |
2 |
True |
True |
16#C0_C0_C0 |
3 |
Colors |
2 |
True |
True |
16#FF_FF_00 |
4 |
Small Button |
1 |
False |
False |
16#C0_C0_C0 |
5 |
Large Button |
4 |
True |
True |
16#0F_B3_FF |
Input:
id : INT
The ID of the button - between 1 and the button count defined in nmpButtonsDefine.
weight : INT (default : 1)
Determines the width of the button relative to the total weight of all the buttons.
A button with weight 2 is twice as wide as a button with weight 1. If the total weight of the buttons is 4, a button with weight 2 will have a width 50% of this.
max_width : INT (0..100, default: 0)
Determines the maximum width of the button as an integer between 1 and 100, where 100 is the entire width of the panel.To have no maximum value, use 0.
This is used to prevent a button from becoming too wide when only a few buttons are defined by limiting the width to e.g. 50 % of the total width.
visible : BOOL (default: FALSE)
The visibility of the button.
enable : BOOL (default: FALSE)
Determines if the button is enabled and can raise the "NMP Button Pressed" event. See also navWaitEvent for event # 11.
color: DINT (-1, 16#00_00_00..16#FF_FF_FF, default: -1)
This determines the color of the button. If -1, the theme color will be used.
Instead of specifying the color directly, the nmpRGBToDint function can be used.
night_color: DINT (-1, 16#00_00_00..16#FF_FF_FF, default: -1)
This determines the color of the button to use when in the night theme. If -1, the day color will be used unless it is set to use the theme, in which case the color of the night theme will be used.
Instead of specifying the color directly, the nmpRGBToDint function can be used.
text : STRING
The text of the button. Max. 49 characters.
Returns: INT
0 |
- Success. |
-1 |
- Navigation interface is not open. |
-2 |
- Error communicating with navigation device. |
-4 |
- The navigation device rejected the command. |
-8 |
- Invalid parameters. |
-11 |
- This is not supported by the device (the device is not an NMP device). |
-12 |
- Navigation interface is busy. |
Declaration:
FUNCTION nmpButtonCreate : INT;
VAR_INPUT
id : INT;
weight : INT := 1;
visible : BOOL := FALSE;
enable : BOOL := FALSE;
max_width : INT := 0;
text : STRING;
color : SINT := -1;
night_color : SINT := -1;
END_VAR;
Example:
INCLUDE rtcu.inc
PROGRAM test;
VAR
rc : INT;
END_VAR;
BEGIN
...
// Create button with text "Click Me" and a bright yellow backgound for the day, and a dark yellow color for the night.
rc := nmpButtonCreate(id := 1, text := "Click Me", visible := TRUE, enable := TRUE,
color:= 16#FF_FF_00, night_color:= 16#C8_C8_00);
IF rc <> 0 THEN
DebugFmt(message := "Error: nmpButtonCreate=\1", v1 := rc);
END_IF;
...
END;
END_PROGRAM;