We now have a empty project named "Greenhouse-1". Now we will add some program code to this empty project.
First, right-click on the "Program" in the project tree. This will show a little drop-down menu with three items in it:
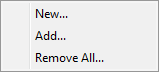
Click on "New". Now you should see a "save dialog" like this one:

Name the new file "Greenhouse_1". This will create a file with the name "Greenhouse_1.VPL". The ".VPL" is the suffix used for VPL programs, and it is fixed in the RTCU IDE environment and cannot be changed.
The RTCU IDE has now created the new file for you. This file is open for you in the editor. In addition to this, it has created a program template. The file should look like this now:
//-----------------------------------------------------------------------------
// Greenhouse_1.vpl, created 2000-12-31 14:45
//
//-----------------------------------------------------------------------------
INCLUDE rtcu.inc
// Input variables that can be configured via the configuration dialog
VAR_INPUT
END_VAR;
// Output variables that can be configured via the configuration dialog
VAR_OUTPUT
END_VAR;
// The global variables of the program
VAR
END_VAR;
PROGRAM Greenhouse_1;
// The next code will only be executed once after the program starts
BEGIN
// Code from this point until END will be executed repeatedly
END;
END_PROGRAM;
The only difference will be the text "created xxxx-xx-xx xx:xx" in the comment field at the very top of the file. This will, of course, show the current date and time.
We will not try to explain anything about the different statements in the program, as this will be covered in great detail in the online manual, but you still might want to have a look at the file as it is.
You now have a basic program that will do absolutely nothing. This will be of great help, however, as you do not have to read a lot about syntax in VPL programs and the like. You just get a basic template, onto which you can immediately begin writing some useful code. This will be the subject of the next chapter.
Chapter 4 Write the program